Kita akan mengkonfigurasi DNS Server. pada setting kali ini anda harus teliti salah satu karakter saja maka konfigurasi tidak akan berjalan. Silahkan ikuti langkah berikut:
1) apt-get install bind9
2) cd /etc/bind
3) pico named.conf.local
zone "tombelsland.co.cc" {
type master;
file "/etc/bind/db. tombelsland ";
};
1) apt-get install bind9
2) cd /etc/bind
3) pico named.conf.local
zone "tombelsland.co.cc" {
type master;
file "/etc/bind/db. tombelsland ";
};
zone "sub. tombelsland.co.cc" {
type master;
file "/etc/bind/db.sub";
};
zone "1.16.172.in-addr.arpa" {
type master;
file "/etc/bind/db.172";
};
| 4) pico named.conf.options options { directory "/var/cache/bind"; forwarders { 192.168.1.62; }; allow-query { any; }; auth-nxdomain no; # conform to RFC1035 listen-on-v6 { any; }; }; 5) cp db.local db.tombelsland 6) cp db.local db.sub 7) cp db.127 db.172 8) pico db. tombelsland ; ; BIND data file for local loopback interface ; $TTL 604800 @ IN SOA tomi. tombelsland.co.cc. tomi. tombelsland.co.cc. ( 2 ; Serial 604800 ; Refresh 86400 ; Retry 2419200 ; Expire 604800 ) ; Negative Cache TTL ; @ IN NS tomi. tombelsland.co.cc. @ IN MX 10 mail. tombelsland j.co.cc. @ IN A 172.16.1.62 antoro IN A 172.16.1.62 www IN CNAME tomi mail IN CNAME tomi 9) pico db.sub ; ; BIND data file for local loopback interface ; $TTL 604800 @ IN SOA sub. tombelsland.co.cc. sub. tombelsland.co.cc. ( 2 ; Serial 604800 ; Refresh 86400 ; Retry 2419200 ; Expire 604800 ) ; Negative Cache TTL ; @ IN NS sub. tombelsland.co.cc. @ IN A 172.16.1.62 sub IN A 172.16.1.62 www IN CNAME sub 10) pico db.172 ; BIND reverse data file for local loopback interface ; $TTL 604800 @ IN SOA tomi. tombelsland.co.cc. tomi. tombelsland.co.cc. ( 1 ; Serial 604800 ; Refresh 86400 ; Retry 2419200 ; Expire 604800 ) ; Negative Cache TTL ; @ IN NS tomi. tombelsland.co.cc. 62 IN PTR tomi. tombelsland.co.cc. * 62 berasal dari : 172.16.1.62 11) pico /etc/resolv.conf search tombelsland.co.cc nameserver 127.0.0.1 nameserver 172.16.1.62 nameserver 192.168.1.62 12) /etc/init.d/bind9 restart Stopping domain name service...: bind9. Starting domain name service.....: bind9. 13) Sekarang kita check DNS Server kita melalui windows, masuk CMD dan ketikkan : C:\Users\tomi>nslookup tombelsland.co.cc Server: tomi. tombelsland.co.cc Address: 172.16.1.62 Name: tombelsland j.co.cc Address: 172.16.1.62 C:\Users\tomi>nslookup tomi. tombelsland.co.cc Server: tomi. tombelsland co.cc Address: 172.16.1.62 Name: tomi. tombelsland.co.cc Address: 172.16.1.62 C:\Users\tomi>nslookup mail.tombelsland.co.cc Server: tomi. tombelsland.co.cc Address: 172.16.1.62 Name: tomi. tombelsland.co.cc Address: 172.16.1.62 Aliases: mail. tombelsland j.co.cc C:\Users\tomi>nslookup www.tombelsland.co.cc Server: tomi. tombelsland.co.cc Address: 172.16.1.62 Name: tomi. tombelsland.co.cc Address: 172.16.1.62 Aliases: www. tombelsland j.co.cc C:\Users\tomi>nslookup sub.tombelsland.co.cc Server: tomi. tombelsland.co.cc Address: 172.16.1.62 Name: sub.tombelsland.co.cc Address: 172.16.1.62 |
Langkah terakhir yang akan kita lakukan adalah mengkonfigurasi DHCP Server.. Silahkan ikuti langkah berikut:
1) apt-get install dhcp3-server
Non-authoritative version of DHCP server OK
2) pico /etc/dhcp3/dhcpd.conf
# option definitions common to all supported networks...
option domain-name "tombelsland.co.cc";
option domain-name-servers tomi.tombelsland.co.cc;
# If this DHCP server is the official DHCP server for the local
# network, the authoritative directive should be uncommented.
authoritative;
# A slightly different configuration for an internal subnet.
subnet 172.16.1.0 netmask 255.255.255.192 {
range 172.16.1.2 172.16.10.61;
option domain-name-servers 172.16.1.62;
option domain-name " tombelsland.co.cc";
option routers 172.16.1.0;
option broadcast-address 172.16.1.63;
default-lease-time 600;
max-lease-time 7200;
}
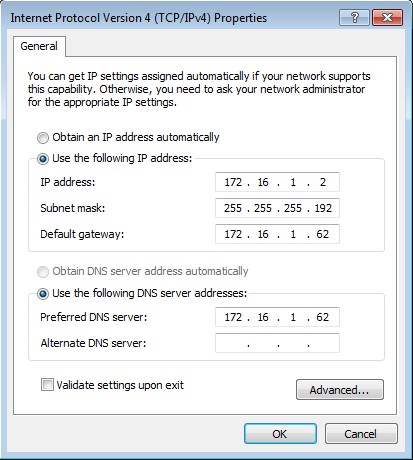
| 3) Reboot 4) Sambil menunggu komputer server hidup kembali. Ubah settingan TCP/IP di client windows menjadi:  5) Kemudian ping dari komp windows ke komp server. C:\Users\tomi>ping 172.16.1.62 Pinging 172.16.1.62 with 32 bytes of data: Reply from 172.16.1.62: bytes=32 time<1ms TTL=64 Reply from 172.16.1.62: bytes=32 time<1ms TTL=64 Reply from 172.16.1.62: bytes=32 time<1ms TTL=64 Reply from 172.16.1.62: bytes=32 time=1ms TTL=64 Ping statistics for 172.16.1.62: Packets: Sent = 4, Received = 4, Lost = 0 (0% loss), Approximate round trip times in milli-seconds: Minimum = 0ms, Maximum = 1ms, Average = 0ms C:\Users\tomi>ping 192.168.1.1 Pinging 192.168.1.1 with 32 bytes of data: Reply from 192.168.1.1: bytes=32 time=1ms TTL=64 Reply from 192.168.1.1: bytes=32 time<1ms TTL=64 Reply from 192.168.1.1: bytes=32 time<1ms TTL=64 Reply from 192.168.1.1: bytes=32 time<1ms TTL=64 Ping statistics for 192.168.1.1: Packets: Sent = 4, Received = 4, Lost = 0 (0% loss), Approximate round trip times in milli-seconds: Minimum = 0ms, Maximum = 1ms, Average = 0ms 6) Check mulai dari DNS, Web, Mail, Ftp, Proxy. Jika bisa, berarti konfigurasi anda berhasil. |
2. Konfigurasi Web Server Debian Lenny
1) apt-get install apache2 php5
2) pico /etc/apache2/sites-available/default (Tambahkan pada baris terakhir)
<VirtualHost *:80>
ServerAdmin tomi@tombelsland.co.cc
ServerName www. tombelsland.co.cc
ServerAlias tombelsland.co.cc
DocumentRoot /var/www/
</VirtualHost>
3) /etc/init.d/apache2 restart
Restarting web server: apache2 ... waiting .
4) pico /var/www/index.html
<html><body><h1>www. tombelsland.co.cc berhasil</h1></body></html>
5) Buka browser komputer client dan masukkan url www. tombelsland co.cc.
Sekarang kita akan mengkonfigurasi FTP Server. Hanya diperlukan beberapa Langkah untuk mengkonfigurasi FTB server tersebut.
1) apt-get install proftpd
Run proftpd : standalone
2) pico /etc/proftpd/proftpd.conf
# Includes DSO modules
Include /etc/proftpd/modules.conf
# Set off to disable IPv6 support which is annoying on IPv4 only boxes.
UseIPv6 off
# If set on you can experience a longer connection delay in many cases.
IdentLookups off
ServerName "tomi.tombelsland.co.cc"
ServerType standalone
DeferWelcome off
3) /etc/init.d/proftpd restart
Stopping ftp server: proftpd.
Starting ftp server: proftpd.
Stopping ftp server: proftpd.
Starting ftp server: proftpd.